Amish White Bread–a no fail recipe for the very best tender, fluffy white sandwich loaf bread with a slightly sweet taste. Use your Instant Pot to proof the dough to speed up the process.
Amish White Bread
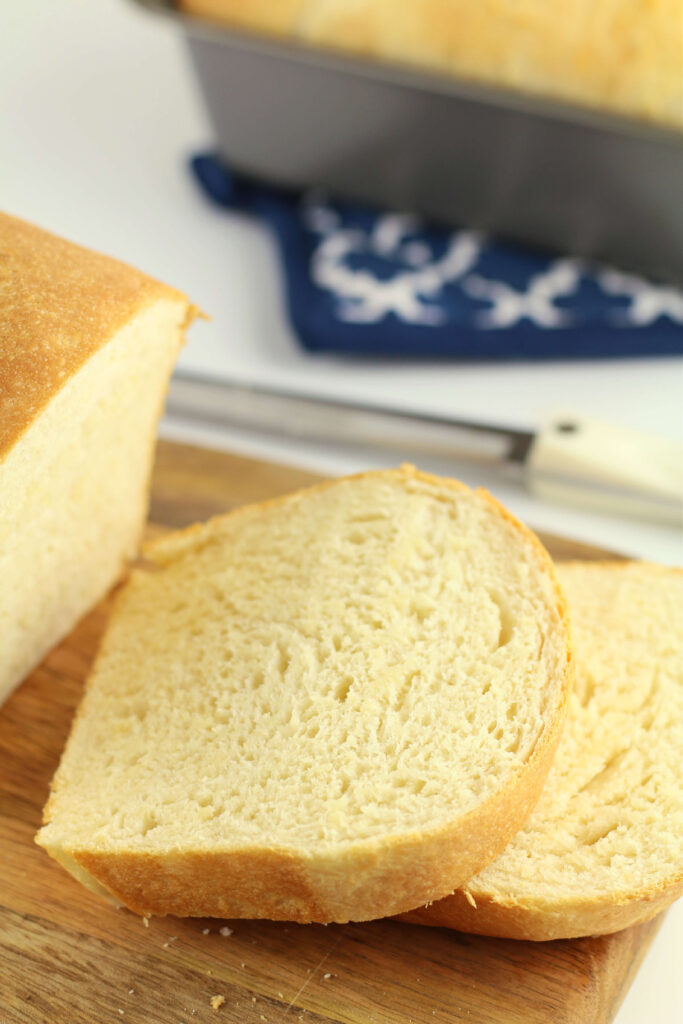
I don’t often make yeast breads because of the time it takes with the proofing and the fuss. But this bread is sooooo good I couldn’t get enough. It is a bit sweet, sort of like a Hawaiian bread or the rolls you get at Texas Roadhouse. The recipe makes 2 loaves. You can easily double the recipe to make 4 loaves. Give away to your lucky friends or neighbors or store in the freezer for another day.
This bread is perfect for slicing and having as the base of a sandwich. It’s also great as toast. It’s sweet enough that butter slathered on top is just right. No need for honey or jam.
I used a stand mixer to mix my ingredients together and knead the dough. If you don’t have a stand mixer, no problem! The Amish don’t either and kneading by hand works out just fine.
What ingredients do I need to make Amish bread?
You only need a handful of ingredients to make this luscious amish white bread recipe.
- Warm water
- Warm milk
- White sugar
- Active dry yeast*
- Salt
- Vegetable–or canola oil
- Bread flour–If you don’t have bread flour you can use all purpose flour. The bread might not raise as high and be as fluffy but it will still taste amazing.
- Butter
Instructions
- Add warm water and milk to bowl of a stand mixer fitted with a dough hook (you can also make this recipe without a mixer, add ingredients to a large mixing bowl). The water and milk should be about 110 degrees*. This is nice and warm but not hot. Stir in the sugar and let it dissolve.
- Sprinkle the yeast into the bowl and whisk a little. Let the yeast mixture get foamy (about 5 minutes).
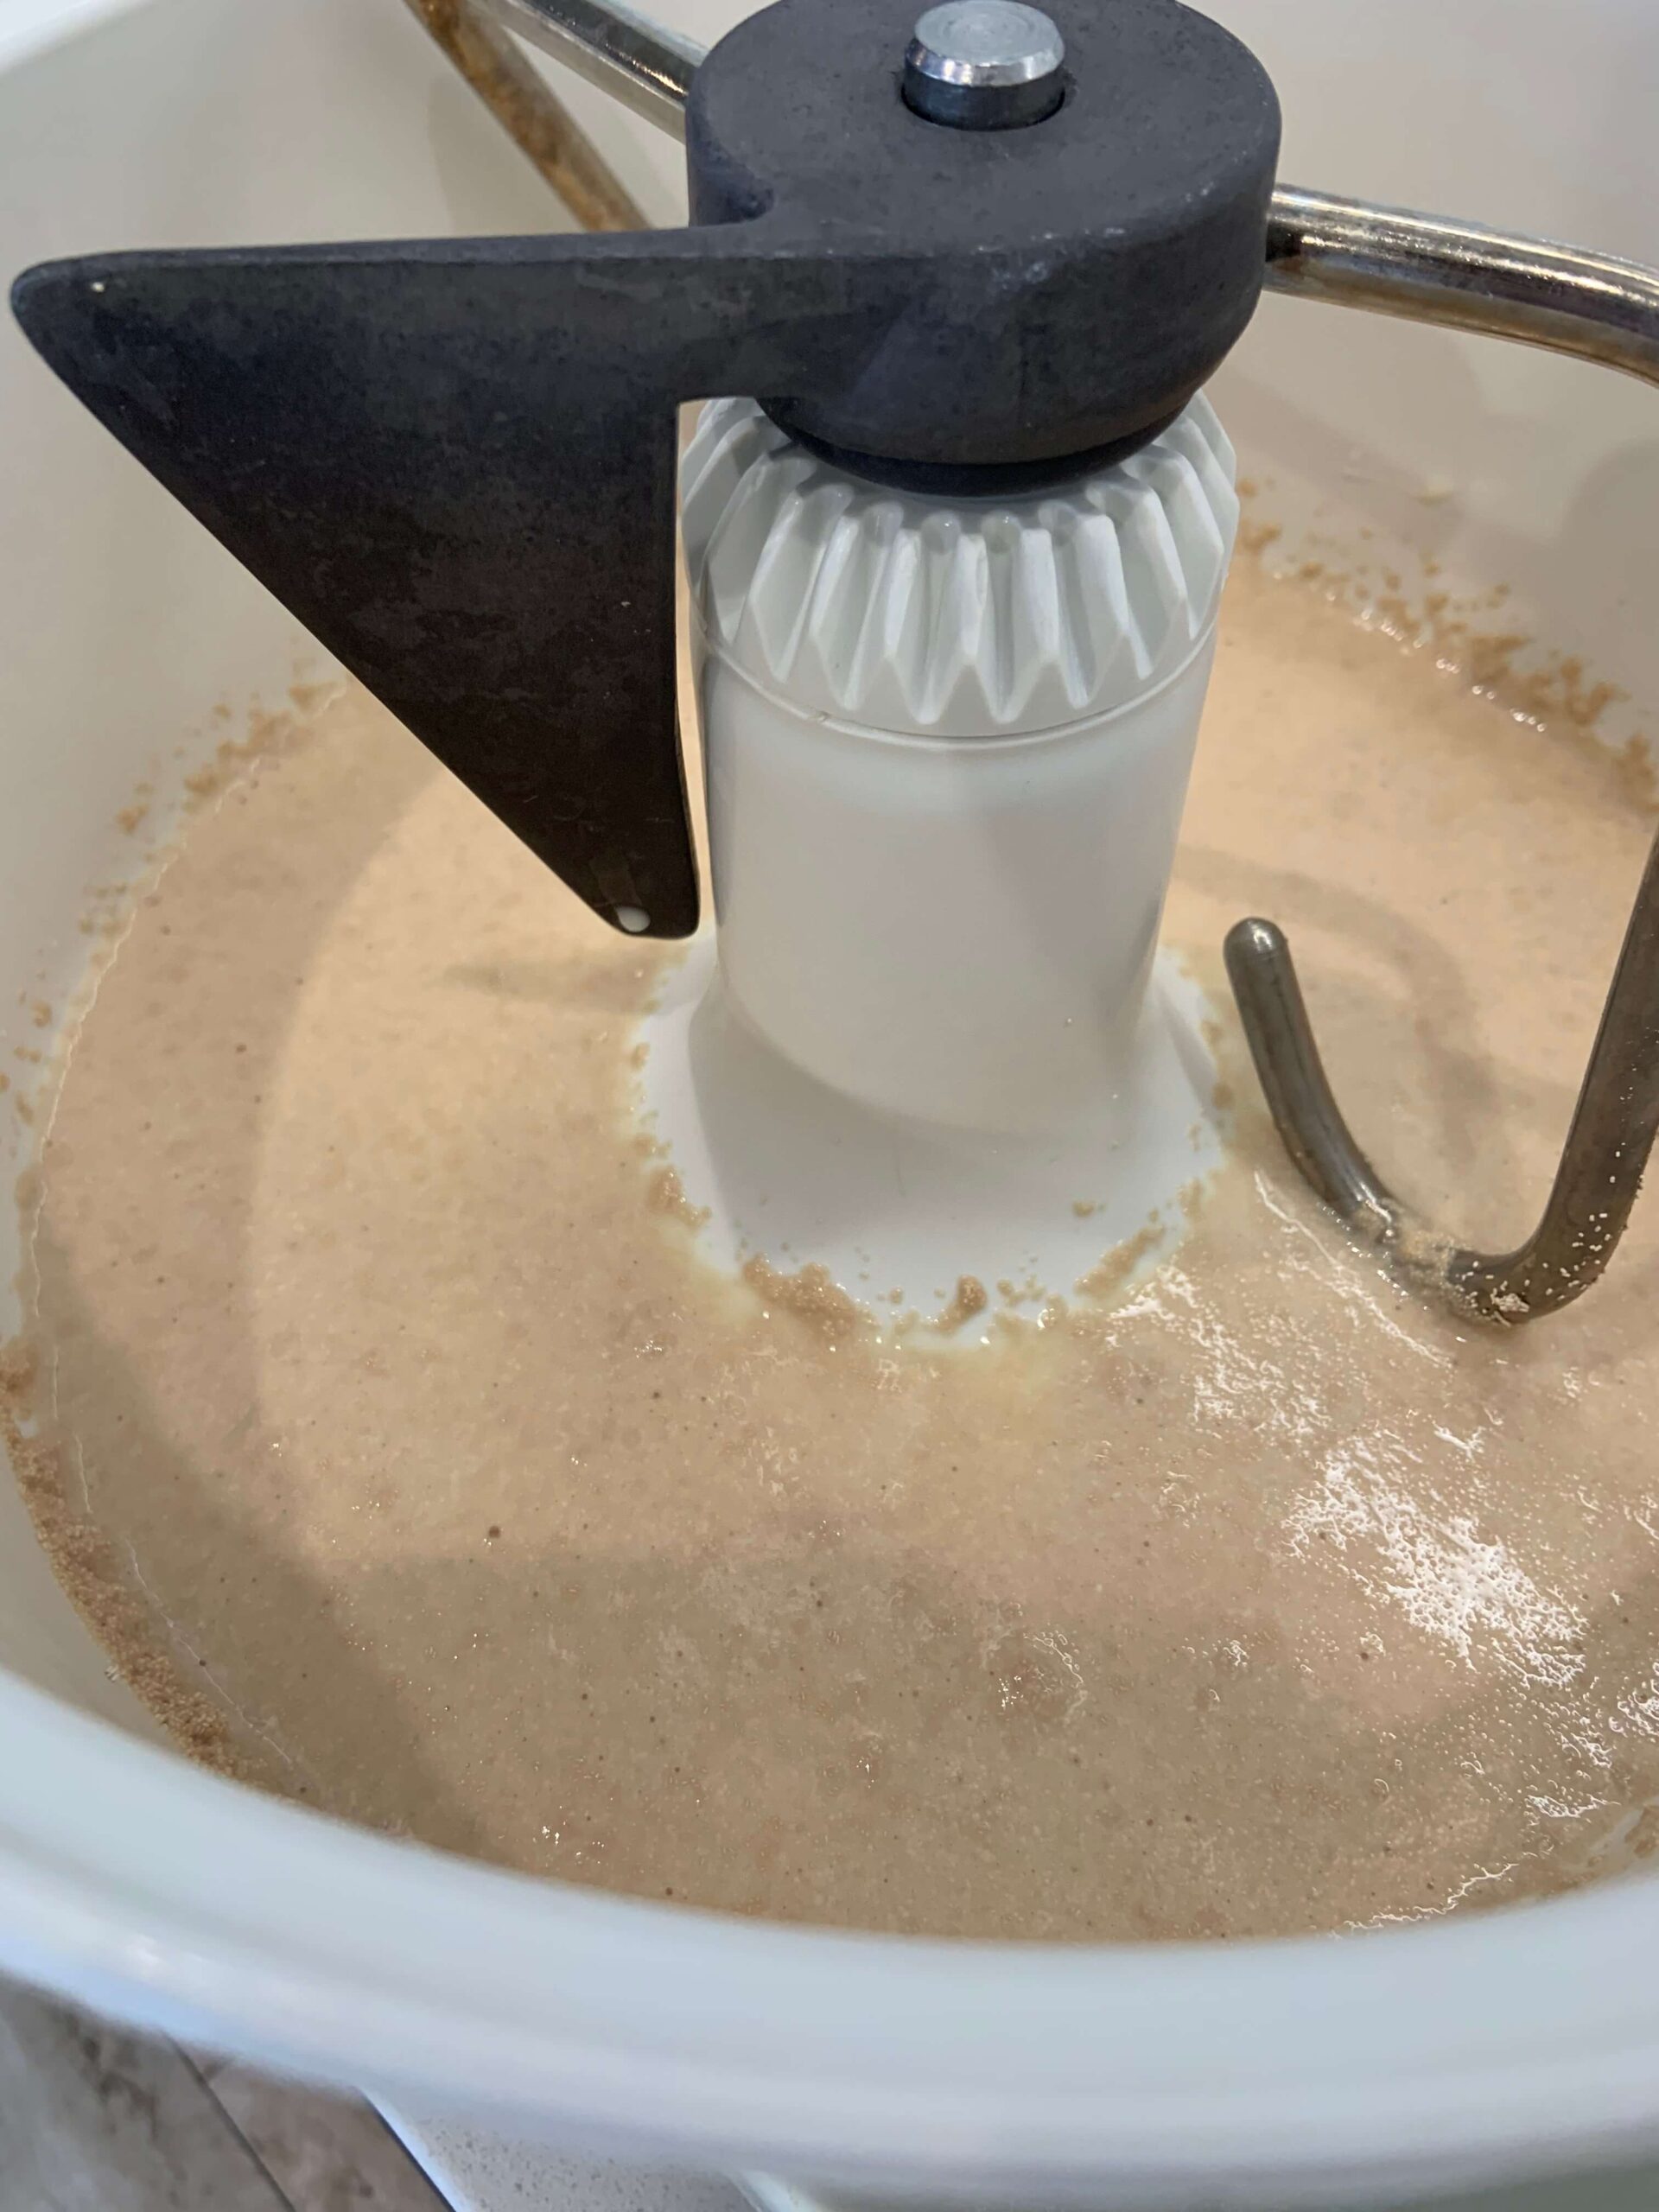
- Add in the salt, oil and 1 cup of the flour. Mix for 20 seconds.
- Then add in the rest of the flour, 1 cup at a time while the the mixer is on low. The dough should pull away from the sides of the bowl (you may have to add a little extra flour).
- Mix for 5 minutes (without a mixer knead for 10 minutes on a floured surface)
- Spray your Instant Pot liner with non-stick cooking spray or swirl oil in the bottom of it. Place the dough into the Instant Pot liner. Set Instant Pot to yogurt function LESS (use adjust button to get it to less, it should say 24 hours). Cover Instant Pot with a glass lid or a plate and let it raise for 30 minutes, or until doubled. (If you don’t have a yogurt button then just raise the bread on the counter for about 60 minutes.)
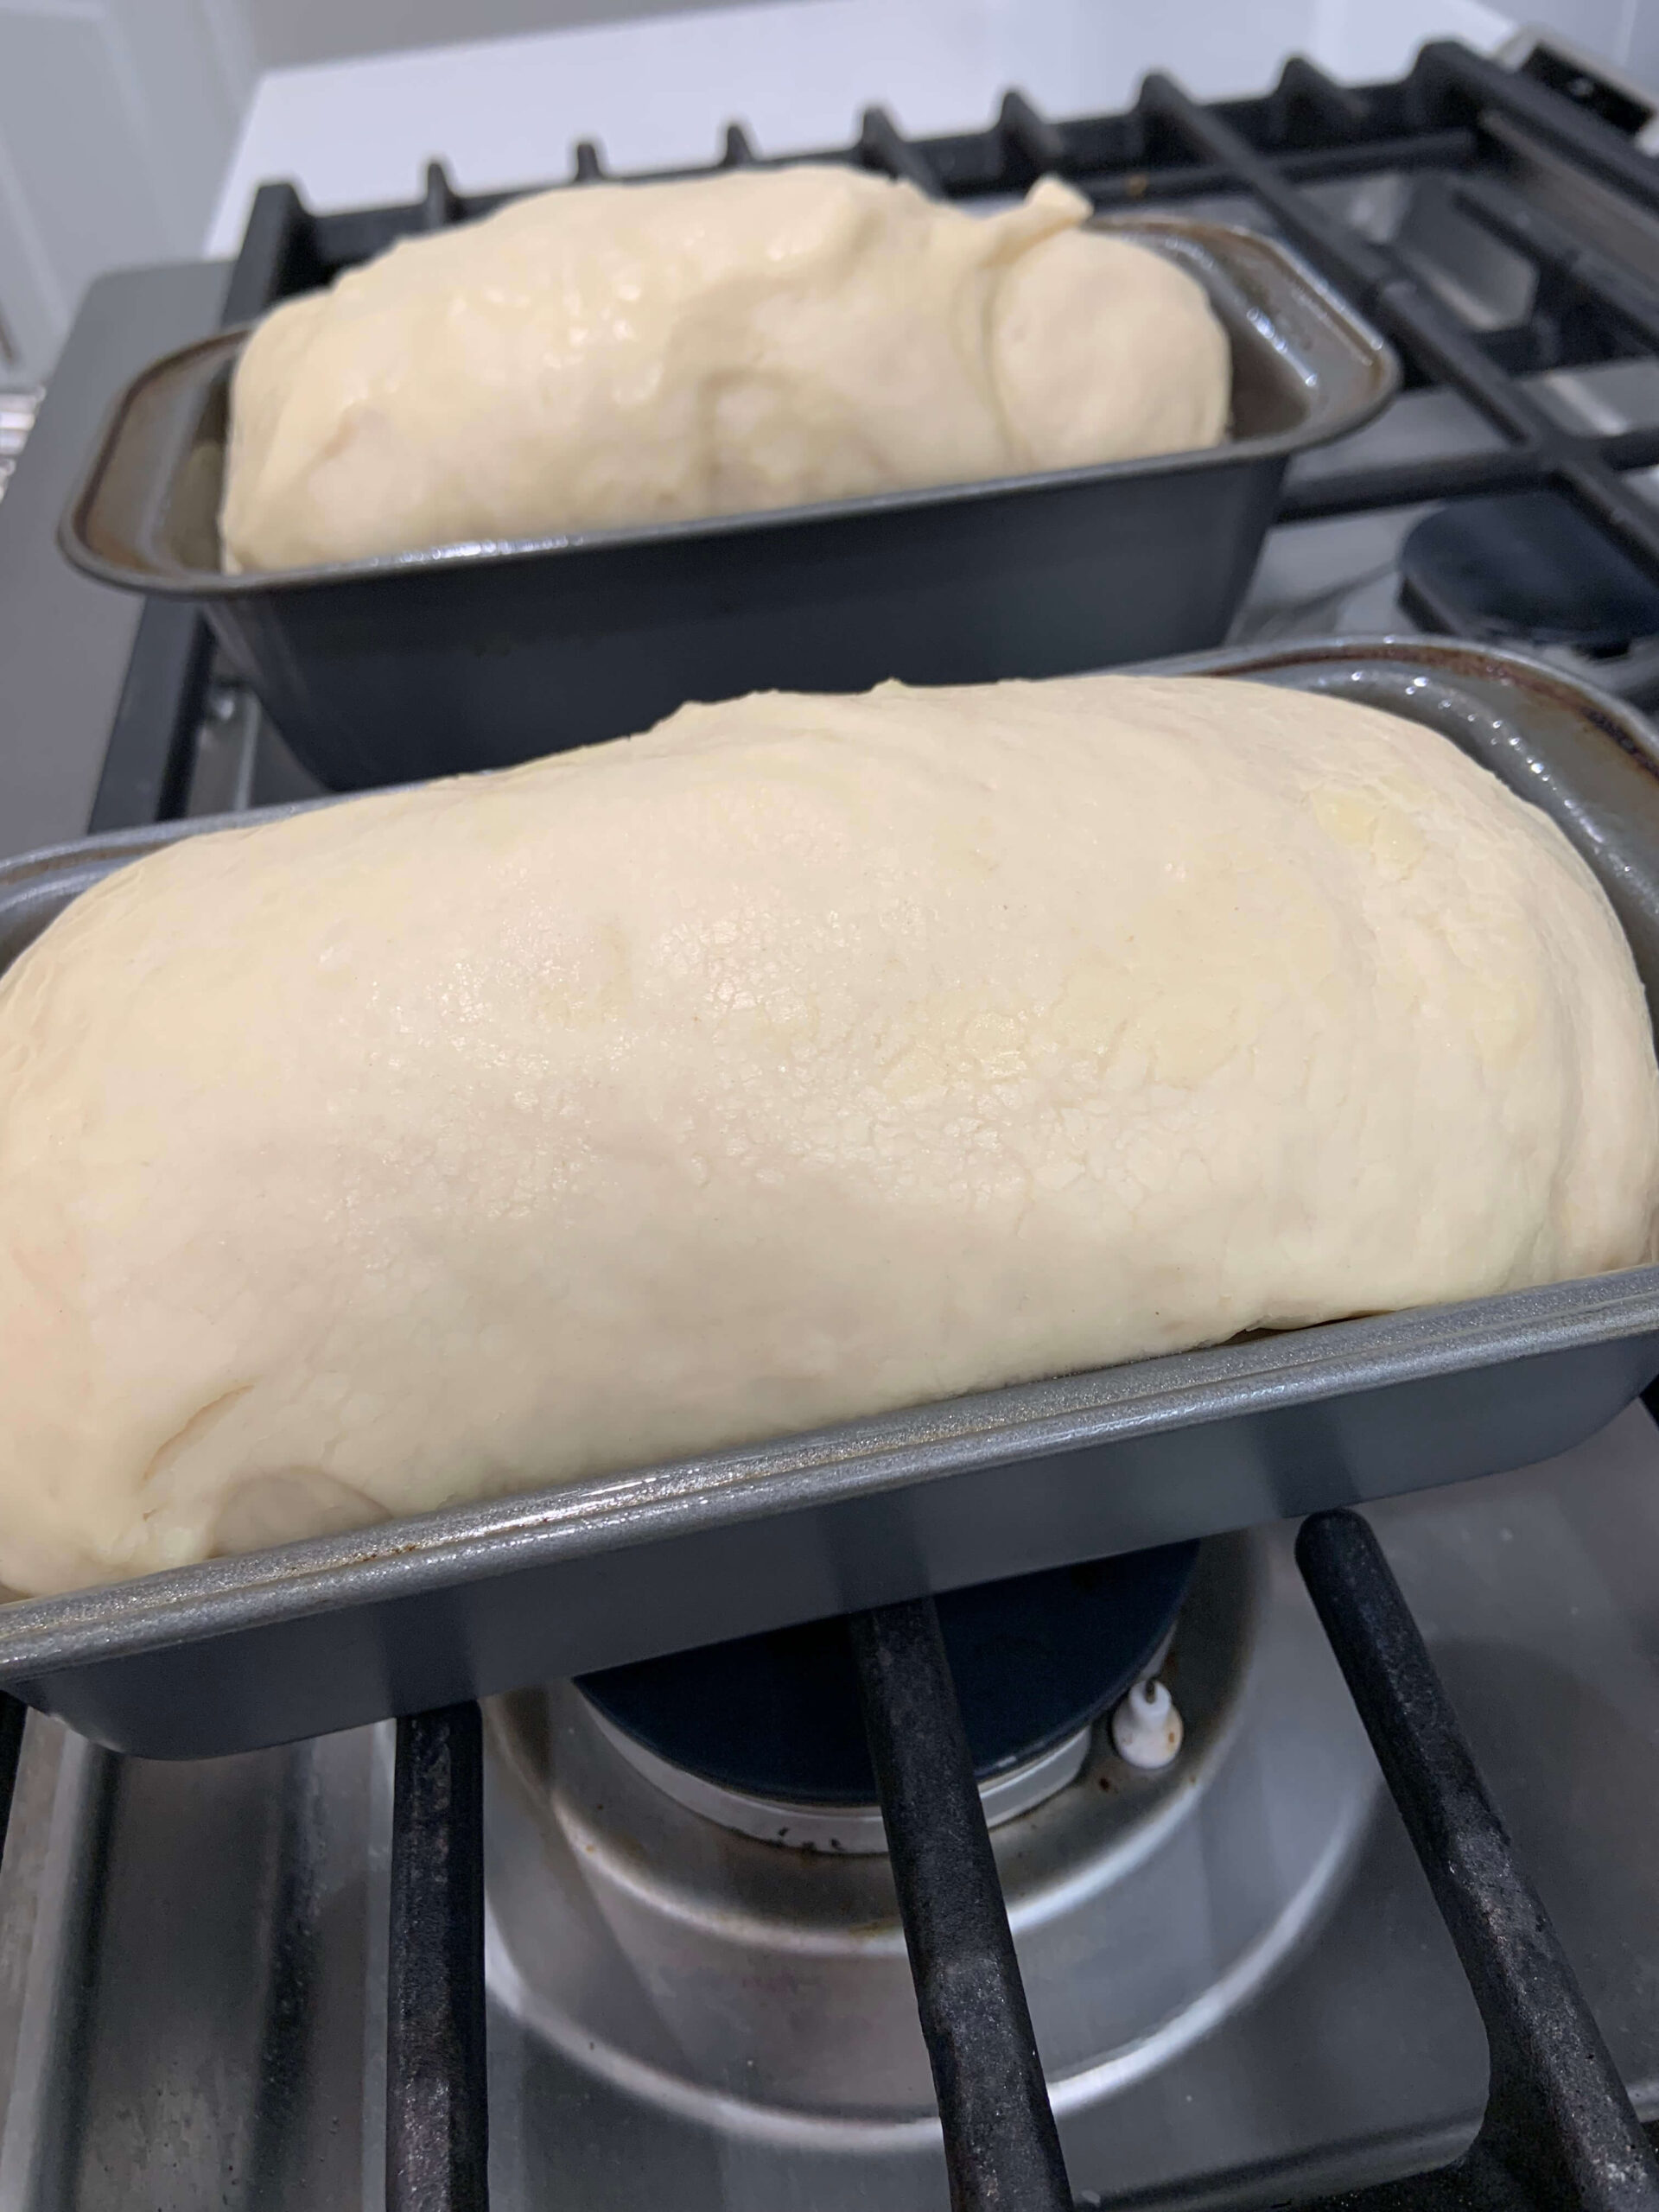
- Punch dough down. Knead for 3 minutes by hand. Divide into two equal portions. Let rest for 5 minutes.
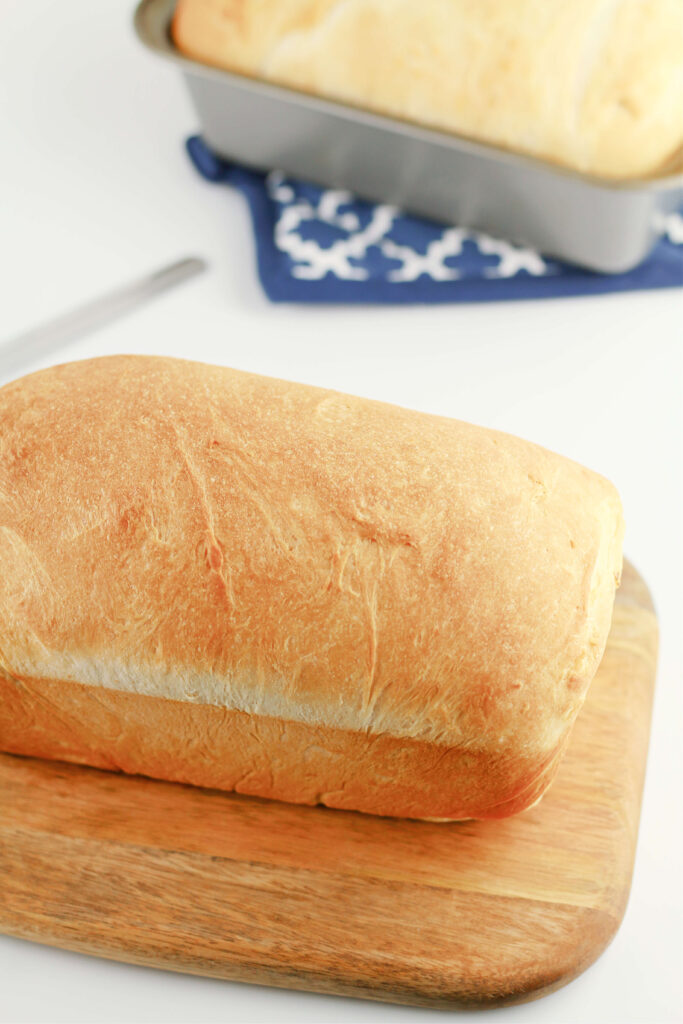
- Shape the divided doughs into loaves. Grease two 9×5 inch bread pans. Place the loaves into the pans. Brush with the melted butter. Let the loaves raise for 30 minutes, or until dough is about 1 inch above the pans.
- Bake for 30 minutes in a 350 degree oven. Loaves should sound hollow when tapped.
How to use Instant Pot to proof bread?
If you have a yogurt function on your Instant Pot you can use your Instant Pot to proof dough (raise dough) faster. It works so well. The ideal temperature for proofing bread is 78-90 degrees. And the lowest setting on the Instant Pot yogurt mode (usually used for Jiu Niang) has temps between 86-93.2°F.
How to use the Instant Pot to proof dough: Push the yogurt button. Use the adjust button (or press yogurt button again…depending on the model of your IP) to cycle through until the light is on the “less.” My pot says 24 hours on the display. Then cover the pot with a glass lid or a plate. DO NOT use the normal Instant Pot lid. If you do the dough might raise so high that it pushes the valve up and indicates to the pot that there is under pressure. You won’t be able to open the pot and the lid will be stuck. Let the dough raise for about 20-25 minutes, or until it has doubled.
What if I don’t have a yogurt button?
If you don’t have a yogurt button on your Instant Pot just let the dough raise in the mixing bowl for about 60 minutes or until doubled in size.
How to shape bread dough into a loaf?
I must admit I am pretty bad at this step and my loaves don’t always look picture perfect. Follow this tutorial for how to get the perfect shaped loaf every time.
- Use a rolling pin to roll the dough into a rectangle.
- Starting along a long side pick up the dough and roll the dough up (like a jelly roll).
- Pinch the seam closed with your fingers.
- Fold one short end of the bread over the seam, and pinch it closed. And then repeat on the other side.
- Place in a loaf pan with the seam on the bottom.
What’s the difference between bread flour and all-purpose flour?
Bread flour has a high amount of protein. Because of the higher content of protein in can produce more gluten and achieve the desired rise in bread. More protein is able to absorb more liquid so the bread will hold its shape and rise up instead of out. The high gluten in the bread produces a lighter and chewier bread, as opposed to a bread that is more dense and crumbly.
All purpose flour was designed to work with all sorts of baked goods…hence its name. It works well for just about every bread, cookie and cake recipe. While bread flour holds a higher protein content than that of all purpose flour, all purpose flour does still contain quite a bit of protein. This allows the flour to remain firm and hold its structure. Bread flour is ideal in this amish white bread recipe but not essential. Your bread will still be awesome with all purpose flour.

Can I use less sugar?
This bread is quite sweet (and delicious!). If you’d like you can cut the sugar down by half.
Helpful Equipment
- I love my Bosch mixer from the 1980s. It is something I inherited and it won’t stop it’s so sturdy and amazing. Bosch mixers are expensive but they are the best tool that you can buy if you’re serious about making bread.
- Bread pans*
- An Instant Pot* with a yogurt button
- Pastry brush* for brushing the melted butter on the dough
More Homemade Bread Recipes…
- Christmas Tree Bread
- Easy French Bread Recipe
- Instant Pot Barbecue Chicken Flatbread Pizzas
- Orange Rolls
- Instant Pot Garbage Bread
- Texas Kolaches
- Instant Pot Soft Pretzels
Did you know you can filter the recipes on my website to search by meat type, IP or Crockpot, low carb, gluten free, etc. Use the filter to find exactly what you are looking for.
Want More Tried And True Instant Pot Recipes?
- Sign up to receive daily Instant Pot recipes (it’s FREE)
- Join the 365 Days of Instant Pot Recipes Facebook group
- Subscribe to my YouTube channel
- Buy the 365 Days of Pressure Cooking Cookbook

Amish White Bread
- Yield: 2 loaves 1x
Description
The very best tender, fluffy white sandwich loaf bread with a slightly sweet taste. Use your Instant Pot to proof the dough to speed up the process.
Ingredients
- 1 cup warm water
- 1 cup warm milk
- 2/3 cup sugar
- 1 1/2 tablespoons active dry yeast
- 1 1/2 teaspoons salt
- 1/4 cup vegetable or canola oil
- 5–1/2 cups bread flour, you may need a little more or a little less
- 1 tablespoon butter, melted
Instructions
- Add warm water and milk to stand mixer fitted with a dough hook. The water and milk should be about 110 degrees. This is nice and warm but not hot. Stir in the sugar and let it dissolve.
- Sprinkle the yeast into the bowl and whisk a little. Let the yeast mixture get foamy (about 5 minutes).
- Add in the salt, oil and 1 cup of the flour. Mix for 20 seconds.
- Then add in the rest of the flour, 1 cup at a time while the the mixer is on low. The dough should pull away from the sides of the bowl.
- Mix for 5 minutes.
- Spray your Instant Pot liner with non-stick cooking spray or swirl oil in the bottom of it. Place the dough into the Instant Pot liner. Set Instant Pot to yogurt function LESS (use adjust button to get it to less, it should say 24 hours). Cover Instant Pot with a glass lid or a plate and let it raise for 30 minutes, or until doubled.
- Punch the dough down. Knead for 3 minutes by hand. Divide into two equal portions. Let rest for 5 minutes.
- Shape into loaves and place into two 9×5 inch loaf pans. Brush with the melted butter. Let the loaves raise for 30 minutes, or until dough is about 1 inch above the pans.
- Bake for 30 minutes in a 350 degree oven. Loaves should sound hollow when tapped.
Notes
If you don’t have bread flour you can use all purpose flour. The bread might not raise as high and be as fluffy but it will still taste amazing.
If you don’t have a stand mixer you can knead by hand. Mix in the flour until you have a sticky dough. Plop the dough onto a floured surface and knead for 10 minutes or until the dough is smooth and elastic.
Read the whole blog post for more tips.

*Karen Petersen is a participant in the Amazon Services LLC Associates Program, an affiliate advertising program designed to provide a means for sites to earn advertising fees by advertising and linking to amazon.com.
Do you have a recipe for baking bread in the instant pot using the air-fryer lid?
I’m sorry, I do not. I’m not sure how/if that would work.
How would you do this recipe in a bread machine?
Sorry Marge, I am not familiar with bread machines. I really haven’t used one in 20 years. So I can’t answer that!
Using the yogurt function and “less ” will it show 24:00? Is that correct or not?
yes that’s right
Delicious! I don’t have a fancy mixer so I just kneaded the dough by hand for 12 minutes. The instapot didn’t work out well for me because I couldn’t get it to program correctly. In the end the bread turned out well. I used the ingredients as described.
So glad in the end it worked out Sunni!
I made this bread today and it came out prefect…my whole family loved it.
It’s so good huh?! I love it!
Can you use instant yeast for this recipe? I’m new at bread making.
yes!
I made this. It’s now on my bread rotation. Loved it.
I love this one too Rachel! It is so addicting.
OFF TOPIC: THE AMISH MAKE A DENSE SWEET CORN BREAD, SERVED IN ONE INCH SQUARES, (RESTAURANT.) THE PORES IN THE BREAD ARE VERY SMALL AND IS HEAVY FOR IT’S SIZE.
ANY IDEAS ON A RECEIPT FOR A CORN BREAD OF THIS NATURE.
RESTAURANT WENT OUT OF BUSINESS, SO CAN’T ASK THEM FOR HELP’
THANK YOU, ROSE
I’m not sure about that recipe but I love this cornbread and make it all the time. It is a sweet cornbread: https://www.melskitchencafe.com/the-cornbread-and-fluffy-honey-butter/
Here’s a hint that I learned when I went to a bread class. Always, cover your container with plastic wrap tightly when your waiting for the yeast to proof. It does make a big difference. I also put plastic wrap tightly on the bowl when rising the dough. Give it a try, You will see a difference. When kneading the dough by hand, don’t just keep sprinkling flour over your dough as you will get more than needed. Flour your hands and you won’t over flour your dough. Class was a big help so I thought I would pass the info along.
Great info! Thanks Karen!
Ok well my instant pot doesn’t have a yogurt func., now what? And I cannot, being retired, afford to buy another one. Allie
What If I Don’t Have A Yogurt Button? If you don’t have a yogurt button on your Instant Pot just let the dough raise in the mixing bowl for about 60 minutes or until doubled in size.
If you have sous vide mode. Put it to 85 or 90. Set for 45min.
Rub oil on your dough and place in pot.
I check after about 35 min.
It’s fun and easy.
Can I use applesauce or yourgurt in stead of oil
You could try that. I am not sure how it would turn out. It’s only 1/4 cup of oil for 2 loaves of bread so not too much.
I woulnd’t. Applesauce will add more sugar for the yeast and it could lead to bigger holes and a collapse of the bread. Yoghurt will change the acidity and could interfere with the yeast raising action. There’s no reason you can’t use a healthier oil like EV Olive, sunflower or avocado oil. I’d stick to this recipe as close as possible.
When I make bread in my bread machine I use apple sauce with no sugar an at times I use yogurt an the recipe I have says that I can use those ingredient instead of butter. This is just for your information Thanks for your advice
Have you tried this recipe with gluten free flour? What would i need to add/change to adapt to GF?
I am really uncertain and skeptical on how that would turn out. I would go to a gluten free baking website for a white bread recipe since they will be tested and true.
I’m not certain, but you might have to add something else like xanthan gum to help with the stability of the bread. I.e. you need a gluten replacement.
A friend at work gave me this recipe years ago and I still make it weekly. I love it because it’s SO easy and everybody always loves it. Use it for dinner rolls and my cinnamon rolls as well. It’s very versitile.
I’m totally going to use it for dinner rolls!
Can I use this in my bread maker?
since it makes 2 loaves, it may be too much for a breadmaker. you might try halving the recipe & trying that in the machine.
Bread machine instructions
Add ingredients to your bread machine in the order the manufacturer recommends.
Select white bread cycle.
Press “start”.
When the dough has risen once and second cycle of kneading begins, turn the machine off. Press “start” again to reset the machine.
The dough will rise a second time before it bakes.